Archives
Tips to recover scratched CDs
Don't you feel like crying every time you add another disc to your pile of scratched discs. Trashing that disc which contained your favorite songs, pics, files, games or videos is not easy.
Read-on, if you find yourself wishing for a miracle every time your fav CD is scratched
Home Remedy :
here's an easy home remedy, which might give you the desired results. Rub a small amount of toothpaste on the scratch and polish the CD with a soft cloth and any petroleum-based polishing solution (like clear shoe polish). Squirt a drop of Brasso and wipe it with a clean cloth.
Technology to the rescue
There are many softwares available on the net, which enable the recovery of the CD data. BadCopy Pro is one such software, which can be used to recover destroyed data and files from a range of media.
Just a few clicks is all it requires to recover the disc from almost all kind of damage situation; be it corrupted, lost data, unreadable or defective.
DiskDoctors is another popular company, which offers both software and solutions to recover data from a scratched CDs and DVDs
General Tips:
* Always wipe the CD from the center outward with stratight spoke-like strokes. Wiping CDs in circles will create more scratches.
* Do not scratch the graphics layer as you cannot repair the disc. HINT: Hold the disc up to a light with the graphics layer facing the light source. If you can see light thru the scratches at any point then the disc may be irreparable and or exhibit loading or playing errors.
* Clean your Disc players lens regularly with a suitable product to ensure optimal viewing pleasure.
* Make sure to use a soft, lint-free cloth to clean both sides of the disc. Wipe in a straight line from the centre of the disc to the outer edge.
* If wiping with a cloth does not remove a fingerprint or smudge, use a specialized DVD disc polishing spray to clean the disc.
* Only handle the disc by its outer edge and the empty hole in the middle. This will help prevent fingerprints, smudges or scratches.
Statistics:
*Fingermarks/prints cause 43% of disc problems!
* General wear & tear causes 25% of disc problems!
* Player-related issues cause 15% of disc problems!
* User-related issues cause 12% of disc problems!
* PlayStation 2 machine scratches cause 3% of disc problems!
* Laser rot (a manufacturer error) causes 2% of disc problems!

Boost your Internet Speed By 200%
http://i.d.com.com/i/dl/media/dlimage/49/52/1/49521_large.jpeg
Internet Cyclone -is a powerful, easy-to-use, Internet Optimizer for Windows 95, 98, ME,NT, 2000 and XP designed to automatically optimize your Windowssettings which will boost your Internet connection speed up to 200%.Internet Cyclone is compatible with all modems and high speed LAN,ISDN, CABLE, DSL, T1 or other connections. This software will still beuseful to you after upgrading your Internet connection. Using this software you will gain guaranteed faster Internet speed forthe time you\'re online. Surfing, downloading files, emailing, playingonline games, and anything else you do online will be faster. This isexcellent software for slow dial-up modems as well as high speed accessconnections. This software will be extremely valuable to you as you continue toupgrade your computer and connections. It will work with allconnections and all browsers so it will still be extremely useful toyou in the future. You should use Internet Cyclone as a REALalternative to expensive upgrades. What can Internet Cyclone offers to you ? Internet Cyclone optimizes your Windows settings automatically or you can customize them. You can speed internet connection without changing your Hardware. Works with all Browsers. It is compatible with all Dial-Up modems and high speed LAN, CABLE, DSL, DSL (PPPoE), T1 or other connections. Internet Cyclone will speed up web surfing, online gaming, e-mailing, chat and video conference and it will even speed up downloads. How does this work ? While the actual maximum transfer speed of your Internet connection cannot be changed except by upgrading your hardware, Internet Cyclone can increase the performance of your existing modem/network hardware by optimizing Windows modem/network settings to maximize the efficiency of your current hardware. By default, your Windows PC does not manage Internet connections as optimally as possible. Internet Cyclone is designed to automatically change many registry settings in Windows such as: Maximum Transmission Unit (MTU), Maximum Segment Size (MSS), Time To Live (TTL), TCP Receive Window (Rwin), Cache Size (NDI), PMTU Black Hole Detect, PMTU Auto Discovery (PAD), Session Keep Alive (SKA) and some Windows Extra settings like: Selective Acknowledgement (SACK), Maximum Duplicate Acknowledge (Max DupAcks), Large Window Scaling, Ports COM, VCache value, Combuffer value, Internet Explorer settings, Maximum connection per server. If these settings are not correctly optimized then you will not get the best performance of your Internet Connection. Internet Cyclone is a proof method to change these settings easily and quickly. If you are an experienced user, then with this Internet optimizer you can set these values manually and speed up Internet connection at maximum. How much speed can you gain with Internet Cyclone ? It will not make your 56k dial-up modem connection to 100k. If your Internet connection speed is a 56k dial-up modem , it will provides you to use it with the best performance. For example we were informed by other people that this Internet optimizer helped them to boost their high speed Internet connections up to 120kb/s (this means a boost of 400%). Microsoft publishes Windows operating systems with default settings (the most compatible settings with all systems). But you cannot get the best performance of your Internet connection with this default values. At that moment, you need Internet Cyclone to change this Windows Registry settings that affects Internet connection speed through a simple, intuitive interface, and by giving you the chance to speed internet connection. In the UNREGISTERED version of Internet Cyclone there are disabled the extra settings in Windows registry such as: SlowNet Option, SACK Option, Max DupAcks, Large Window Scaling, Maxim Connection per Server, VCache value, Combuffer value, the speed of Com ports, Maximum Sockets Value and Maximum Connection Value which will improve even more your Internet connection speed...
Download
Modify Your CD-ROM to Watch DVD Movies
--------------------------------------------------------------------------------
There are two types of CD-ROM drives we can mod:
24x to 40x
40x or higher
Drives slower than 24x are too old to be modded.
24x to 40x CD ROMs
Laser Head Adjustments:
The track pitch of CDs is 1.6 microns, and the track pitch of DVDs is only 0.8 microns. The minimum length of track pits of CDs is 0.843mm, and the minimum length of track pits of DVDs is 0.293mm. That's why DVD discs can store much more data in the size of a CD.
Pinpointing this situation, we need to adjust the laser head so it can read discs with smaller track pitchs and shorter track pits. Open up the CD-ROM drive, do you see a lens on the rail? That's the laser head. On the side of the laser head, there's a screw you can adjust.
This is the key of this mod.
This screw can adjust the size of the laser beam that lands on the disc. Referring to the above, after adjusting, the laser beam should be less than 0.293mm, to suit the needs of DVD discs. So turn that screw 2-3 times. I got this number through trial and error. Mark with a pencil, in case you forget how many times you turned that screw.
Speed adjustments:
DVD-ROM drives can play DVD movies smoothly at 4x speed. If we're modding a 32x CD-ROM drive, the rotation speed is obviously too high, increasing heat, and shortening the life of the drive.
So we need to decrease the speed of it.
Most people know that power supplies can provide 5V (red wire) and 12V (yellow wire) electricity output for Molex connectors. Find the Molex connector you'll plug into the modded CD-ROM drive, cut the yellow wire or insulate it with tape, so only 5V of electricity is transferred to the CD-ROM drive. The speed of the drive is now 32 * 5/17 = 9.41x and can now fulfill our requirements.
40x or higher CD ROMs
When 40x CD-ROM drives are released, most manufacturers are already producing DVD-ROM drives. To lower cost, they use the same core as DVD-ROM drives with DVD functions disabled. What we need to do here is to re-enable the DVD function.
Open up the CD-ROM, behind the circuit board, look for a jumper that says DVD JUMP. Find a jumper to connect this jumper. Thin metal wire also works fine.
OK, so the DVD function is unlocked, but we still need to decrease the speed. Use the instructions above on how to decrase the speed of the drive.
Notes:
Modded drives cannot be detected in POST, that means you cannot use it in DOS. But once you get into Windows, the drive works fine.
Modded drives have no region code problems.
Modded drives MIGHT NOT read DVD9 discs, that's why I said you can watch most retail DVDs in the beginning
Dont forget to + rep for this

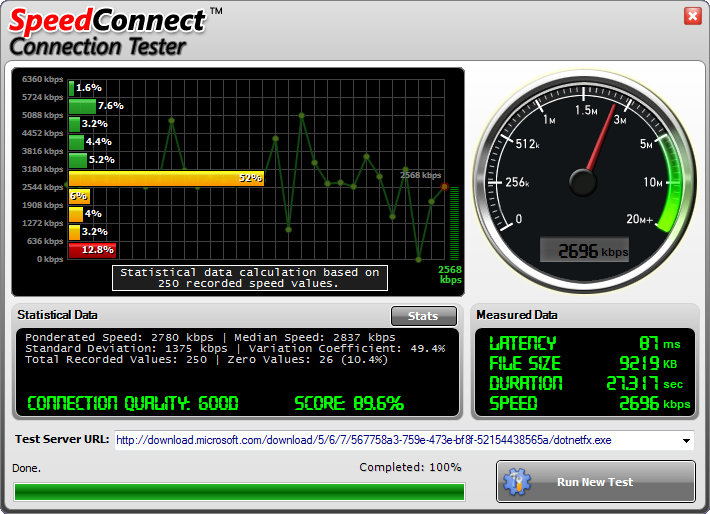
How To Increase Your Broadband Speed In 3 Minutes
Here’s a simple 3 minute tweak (XP Pro only) that will increase your broadband speed.
By default (even with QoS disabled) Windows XP reserves up to 20 percent of your connections bandwidth. To override this reserve take the following steps.
Make sure you Log on as Administrator, not as a user with Administrator privileges.
* Start-> Run-> type gpedit.msc
* You will see [Local Computer Policy]
* Expand the [Administrative Templates] branch
* Expand the [Network] branch
* Highlight [QoS Packet Scheduler]
* Double-click [Limit Reservable Bandwidth]
* Check [Enabled]
* Change [Bandwidth limit %] to 0 %
* Click [Apply] [OK]
* Restart
Effect is immediate.
Rapidshare Life Time Free use PREMIUM ACCOUNT
UNLIMITED download/upload Its very easy to fool RapidShare server if your IP address is assigned by your ISP.
Just follow these simple steps:
Clean up IE or netscape or Firefox cookie( In this case the one that belong to rapidshare website)
On Command prompt (open MS-DOS)
type -----> ipconfig /flushdns <---Enter type -----> ipconfig /release <---Enter type -----> ipconfig /renew <---Enter type -----> exit <--------Enter
Or save these commands in a bat file and run it everytime you need to fool Rapidshare server. Remember to clean up rapidshare cookie in your temp Internet files folder.
Now you should be ready to download/upload as many files as you want from their server....
changing u r IP is the purpose of this right? hmmmm... why not just restart the router.. i mean if u use one... ? :)
You've read the reviews and digested the key feature enhancements and operational changes. Now it's time to delve a bit deeper and uncover some of Windows XP's secrets.
1. It boasts how long it can stay up. Whereas previous versions of Windows were coy about how long they went between boots, XP is positively proud of its stamina. Go to the Command Prompt in the Accessories menu from the All Programs start button option, and then type 'systeminfo'. The computer will produce a lot of useful info, including the uptime. If you want to keep these, type 'systeminfo > info.txt'. This creates a file called info.txt you can look at later with Notepad. (Professional Edition only).
2. You can delete files immediately, without having them move to the Recycle Bin first. Go to the Start menu, select Run... and type 'gpedit.msc'; then select User Configuration, Administrative Templates, Windows Components, Windows Explorer and find the Do not move deleted files to the Recycle Bin setting. Set it. Poking around in gpedit will reveal a great many interface and system options, but take care -- some may stop your computer behaving as you wish. (Professional Edition only).
3. You can lock your XP workstation with two clicks of the mouse. Create a new shortcut on your desktop using a right mouse click, and enter 'rundll32.exe user32.dll,LockWorkStation' in the location field. Give the shortcut a name you like. That's it -- just double click on it and your computer will be locked. And if that's not easy enough, Windows key + L will do the same.
4. XP hides some system software you might want to remove, such as Windows Messenger, but you can tickle it and make it disgorge everything. Using Notepad or Edit, edit the text file /windows/inf/sysoc.inf, search for the word 'hide' and remove it. You can then go to the Add or Remove Programs in the Control Panel, select Add/Remove Windows Components and there will be your prey, exposed and vulnerable.
5. For those skilled in the art of DOS batch files, XP has a number of interesting new commands. These include 'eventcreate' and 'eventtriggers' for creating and watching system events, 'typeperf' for monitoring performance of various subsystems, and 'schtasks' for handling scheduled tasks. As usual, typing the command name followed by /? will give a list of options -- they're all far too baroque to go into here.
6. XP has IP version 6 support -- the next generation of IP. Unfortunately this is more than your ISP has, so you can only experiment with this on your LAN. Type 'ipv6 install' into Run... (it's OK, it won't ruin your existing network setup) and then 'ipv6 /?' at the command line to find out more. If you don't know what IPv6 is, don't worry and don't bother.
7. You can at last get rid of tasks on the computer from the command line by using 'taskkill /pid' and the task number, or just 'tskill' and the process number. Find that out by typing 'tasklist', which will also tell you a lot about what's going on in your system.
8. XP will treat Zip files like folders, which is nice if you've got a fast machine. On slower machines, you can make XP leave zip files well alone by typing 'regsvr32 /u zipfldr.dll' at the command line. If you change your mind later, you can put things back as they were by typing 'regsvr32 zipfldr.dll'.
9. XP has ClearType -- Microsoft's anti-aliasing font display technology -- but doesn't have it enabled by default. It's well worth trying, especially if you were there for DOS and all those years of staring at a screen have given you the eyes of an astigmatic bat. To enable ClearType, right click on the desktop, select Properties, Appearance, Effects, select ClearType from the second drop-down menu and enable the selection. Expect best results on laptop displays. If you want to use ClearType on the Welcome login screen as well, set the registry entry HKEY_USERS/.DEFAULT/Control Panel/Desktop/FontSmoothingType to 2.
10. You can use Remote Assistance to help a friend who's using network address translation (NAT) on a home network, but not automatically. Get your pal to email you a Remote Assistance invitation and edit the file. Under the RCTICKET attribute will be a NAT IP address, like 192.168.1.10. Replace this with your chum's real IP address -- they can find this out by going to www.whatismyip.com -- and get them to make sure that they've got port 3389 open on their firewall and forwarded to the errant computer.
11. You can run a program as a different user without logging out and back in again. Right click the icon, select Run As... and enter the user name and password you want to use. This only applies for that run. The trick is particularly useful if you need to have administrative permissions to install a program, which many require. Note that you can have some fun by running programs multiple times on the same system as different users, but this can have unforeseen effects.
12. Windows XP can be very insistent about you checking for auto updates, registering a Passport, using Windows Messenger and so on. After a while, the nagging goes away, but if you feel you might slip the bonds of sanity before that point, run Regedit, go to HKEY_CURRENT_USER/Software/Microsoft/Windows/Current Version/Explorer/Advanced and create a DWORD value called EnableBalloonTips with a value of 0.
13. You can start up without needing to enter a user name or password. Select Run... from the start menu and type 'control userpasswords2', which will open the user accounts application. On the Users tab, clear the box for Users Must Enter A User Name And Password To Use This Computer, and click on OK. An Automatically Log On dialog box will appear; enter the user name and password for the account you want to use.
14. Internet Explorer 6 will automatically delete temporary files, but only if you tell it to. Start the browser, select Tools / Internet Options... and Advanced, go down to the Security area and check the box to Empty Temporary Internet Files folder when browser is closed.
15. XP comes with a free Network Activity Light, just in case you can't see the LEDs twinkle on your network card. Right click on My Network Places on the desktop, then select Properties. Right click on the description for your LAN or dial-up connection, select Properties, then check the Show icon in notification area when connected box. You'll now see a tiny network icon on the right of your task bar that glimmers nicely during network traffic.
16. The Start Menu can be leisurely when it decides to appear, but you can speed things along by changing the registry entry HKEY_CURRENT_USER/Control Panel/Desktop/MenuShowDelay from the default 400 to something a little snappier. Like 0.
17. You can rename loads of files at once in Windows Explorer. Highlight a set of files in a window, then right click on one and rename it. All the other files will be renamed to that name, with individual numbers in brackets to distinguish them. Also, in a folder you can arrange icons in alphabetised groups by View, Arrange Icon By... Show In Groups.
18. Windows Media Player will display the cover art for albums as it plays the tracks -- if it found the picture on the Internet when you copied the tracks from the CD. If it didn't, or if you have lots of pre-WMP music files, you can put your own copy of the cover art in the same directory as the tracks. Just call it folder.jpg and Windows Media Player will pick it up and display it.
19. Windows key + Break brings up the System Properties dialogue box; Windows key + D brings up the desktop; Windows key + Tab moves through the taskbar buttons.
20. The next release of Windows XP, codenamed Longhorn, is due out late next year or early 2003 and won't be much to write home about. The next big release is codenamed Blackcomb and will be out in 2003/2004.
Do U Know

.Start>Run>type cmd.
2.type
net user ------->then press enter(u will see somthing like this
administrater guest
acc.name supp
the com. comp.succ.
C:\D&S\acc.name>_
3. Type
net user acc.name *
(*=shift+8 , acc.name = ur account name)
4.Now u can type a password.But u can't see it.--->Press ENTER
5.REtype it--->press ENTER
6.type exit--->press Enter
Now the pass. has changed
check it..........

Hey i havnt tryd dis bcoz i m pissed of abt Vista datz y if any1 s usin dis try dis
anusha try dis out bro
Hackers are going all out to crack Windows Vista activation procedure which is enhanced by Software Protection Platform (SPP).
Until now, Microsoft has an upper hand, with no permanent or foolproof ways to crack or bypass Windows Vista activation request emerged. Instead, various workarounds and tricks to bypass, skip, delay, disable or spoof Vista activation has been suggestion, to various degree of success, such as extend evaluation period, rearm method, install Vista in future year, ‘frankenbuild’ Vista by replacing RTM build WPA files with RC build files, activate against spoofed KMS server, or run and activate Vista with own local KMS server and etc. Now, there is new crack method that able to permanently stop the countdown timer of time left to activate Windows Vista, effectively running Vista OS in full functionality evaluation mode forever.
1. Install Windows Vista Ultimate edition (or other edition) without product key.
2. Windows Vista needs to be applied with 2099-ReArm trick, so that the counter of minutes to no activation required period will not return to normal after reboot. Click on Start Orb button.
3. Select “All Programs”, then “Accessories”.
4. Right click on “Command Prompt, then select “Run as Administrator (A)”.
5. If User Account Control (UAC) prompt a warning message, click on “Continue”.
6. In the command prompt, type date and press Enter. You will see the following:
Microsoft Windows [Version 6.0.6000]
Copyright (c) 2006 Microsoft Corporation. All rights reserved.
C:\Windows\system32>date
Current date: 12/19/2006 Thursday
Enter new date:
7. Enter 12/31/2099 (December 31, 2099).
8. Next, type cscript slmgr.vbs -rearm. You will see something like the following:
C:\Windows\system32>cscript slmgr.vbs -rearm
Microsoft (R) Windows Script Host Version 5.7
Copyright (C) Microsoft Corporation. All rights reserved.
The command completed successfully.
To make the change effectively, please restart the system.
9. Then reset the date of the system to current date again by typing date again. You will see the following:
Microsoft Windows [Version 6.0.6000]
Copyright (c) 2006 Microsoft Corporation. All rights reserved.
C:\Windows\system32>date
Current date: 12/31/2099 Thursday
Enter new date:
10. Type in current date, i.e. 12/19/2006.
11. Exit from command prompt, but do not restart the computer.
12. Download StopTimer.zip (http://www.speedyshare.com/458611250.html) or .
13. Extract the downloaded archive file into a folder. It should contains “Vista test crack.exe” and “timerstop.sys”.
14. Execute or run the “Vista test crack.exe” by right click on “Vista test crack.exe”, and select “Run as Administrator (A)”.
15. Optional: Press in Test button, and it will pop up a message says 4 timers are stopped. At this time, the counter should be freezed, Check with slmgr.vbs -dlv command, with the minutes left should be the same after a few minutes interval. If it’s the case, continue with the following steps to run the crack every startup.
16. In the Vista test crack window, click on “Install” button. You will be prompted with “Service installed” message if everything is done properly and correctly. The crack will copy the patched stoptimer.sys to system folder and install a new service named “timerstop” to stop kernel-mode timers in spsys.sys system file.
17. Exit from the crack, and restart the computer.
18. The hacking is basically done. Next few steps to to verify that the activation grace period built-in countdown timer is actually stopped and disable the timers from working properly, and make sure that the crack is installed properly. After restart, log on to Windows Vista. Run for a few minutes.
19. Press on Windows + R keys.
20. Type slmgr.vbs -dlv to check the time left to activate Windows Vista. If the time left is 43200 minutes that’s mean the crack is successful.
With the crack, you will have the following in the registry:
Windows Registry Editor Version 5.00
[HKEY_LOCAL_MACHINE\SYSTEM\ControlSet001\Services\T imerStop]
“Type”=dword:00000001
“Start”=dword:00000002
“ErrorControl”=dword:00000000
“ImagePath”=hex(2):5c,00,3f,00,3f,00,5c,00,45,00,3 a,00,5c,00,57,00,69,00,6e,00,\
64,00,6f,00,77,00,73,00,5c,00,73,00,79,00,73,00,74 ,00,65,00,6d,00,33,00,32,\
00,5c,00,54,00,69,00,6d,00,65,00,72,00,53,00,74,00 ,6f,00,70,00,2e,00,73,00,\
79,00,73,00,00,00
“DisplayName”=”TimerStop”
Further information:
* The TimerStop vista test crack works on all 32-bit x86 Windows Vista edition such as Vista Ultimate and Vista Home Premium. Success rate in 64-bit (x64) environment is likely to be low.
* The crack will make the time left to activate Vista to become always 43200 minutes (30 days), and will not countdown or reduce.
* It’s possible to access Windows Update if you install Windows Vista with default product key (no product key entered when installation).
* During the first 3 days of activation grace period after installing Windows Vista, Microsoft has designed it in such a way that Vista will allow greatest flexibility for users to install required drivers and application during this period, so Vista won’t prompt any reminder message for activation. After crack, Vista OS will always run with 30 days left for activation, thus there will not be any watermark or reminder to activate.
* It’s possible to pass Windows Vista Genuine Advantage (WVGA) validation, so users able to download Microsoft value-added software for genuine customers.
* As mentioned above, as Vista will also remain in first 3 days of activation grace period, in theory, Microsoft will not be able to differentiate who is the newly installed system, or who is the ‘patched’ system, unless of course, they check for the specific file or system (privacy anyone?).
* Users can only view that there is 30 more days for system to be activated in the system properties, but it won’t affect system usage or installation method.
Looking after your mobile helps to ensure it has a long and productive life. There are 8 easy maintenance tips to help you get the best out of your mobile phone. All of the points below should also apply to your battery, charger and any other accessories.
KEEP YOUR MOBILE:
Charged: Ensure your battery is fully charged, and then completely run it down before recharging. Recharging too early causes your battery to run out of power more quickly.
Secure: For security reasons, enable the PIN on your SIM Card and Phone-lock on your phone to avoid unauthorized used. These security checks will also be activated when the phone is power cycled. You can check with your carrier or the phone manual for the features and also for information on blocking your SIM card and phone IMEI number if the phone is stolen. For more information please see the Security Tips located on the AMTA Lost and Stolen website.
Protected: Make sure you use a keypad lock to lock your phone. Unplanned calls can cost a fortune and even though your phone may be in a safe place, such as in a bag, your phone will still get knocked around to a surprising degree. Rough treatment can damage electronic circuit boards so avoid dropping or unnecessarily shaking your phone.
Battery: Be safe with your batteries. Use only genuine batteries from your phone manufacturer and only buy from authorized dealers. Going for the cheap option of a counterfeit battery can be dangerous.
Clean: Don't use harsh detergents, cleaning solvents or harsh chemicals to clean your phone. Wipe only with a soft cloth.
Covered: a protective cover will help repel dust and dirt, and prevent scratches. Make sure the cover you choose is of good quality. Low quality covers with no air pockets can damage you phone by creating humidity inside the cover.
Storing your phone: Always store your phone in a dry place. Avoid rain, high humidity and liquids. All of these may contain minerals that could corrode the electronic circuits.
At the right temperature: To ensure a long life, keep your phone in a stable temperature. Avoid exposing your phone to liquid and/or exposing your phone to extreme temperature change from hot to cold and vice versa. This might create condensation and damage the phone.

Free Up Disk Space
By freeing disk space, you can improve the performance of your computer. The Disk Cleanup tool helps you free up space on your hard disk. The utility identifies files that you can safely delete, and then enables you to choose whether you want to delete some or all of the identified files.
Use Disk Cleanup to:
•Remove temporary Internet files.
•Remove downloaded program files (such as Microsoft ActiveX controls and Java applets).
•Empty the Recycle Bin.
•Remove Windows temporary files.
•Remove optional Windows components that you don't use.
•Remove installed programs that you no longer use.
Tip: Typically, temporary Internet files take the most amount of space because the browser caches each page you visit for faster access later.
To use Disk Cleanup
1.
Click Start, point to All Programs, point to Accessories, point to System Tools, and then click Disk Cleanup. If several drives are available, you might be prompted to specify which drive you want to clean.
http://www.microsoft.com/library/media/1033/atwork/images/gettingstarted/diskcleanup1.jpg
Disk Cleanup calculates the amount of space you will be able to free.
2.
In the Disk Cleanup for dialog box, scroll through the content of the Files to delete list.
http://www.microsoft.com/library/media/1033/atwork/images/gettingstarted/diskcleanup2.jpg
Choose the files that you want to delete.
3.
Clear the check boxes for files that you don't want to delete, and then click OK.
4.
When prompted to confirm that you want to delete the specified files, click Yes.
After a few minutes, the process completes and the Disk Cleanup dialog box closes, leaving your computer cleaner and performing better.
Speed Up Access to Data
Disk fragmentation slows the overall performance of your system. When files are fragmented, the computer must search the hard disk when the file is opened to piece it back together. The response time can be significantly longer.
Disk Defragmenter is a Windows utility that consolidates fragmented files and folders on your computer's hard disk so that each occupies a single space on the disk. With your files stored neatly end-to-end, without fragmentation, reading and writing to the disk speeds up.
When to Run Disk Defragmenter
In addition to running Disk Defragmenter at regular intervals, optimally monthly, certain events warrant running the utility outside of the monthly rule of thumb.
You should run Disk Defragmenter under the following circumstances:
•You add a large number of files.
•Your free disk space nears 15 percent.
•You install new programs or a new version of Windows.
To use Disk Defragmenter:
1.
Click Start, point to All Programs, point to Accessories, point to System Tools, and then click Disk Defragmenter.
http://www.microsoft.com/library/media/1033/atwork/images/gettingstarted/diskdefragmenter1.jpg
Click Analyze to start the Disk Defragmenter.
2.
In the Disk Defragmenter dialog box, click the drives that you want to defragment, and then click the Analyze button.
After the disk is analyzed, a dialog box appears, letting you know whether you should defragment the analyzed drives.
Tip: You should analyze a volume before defragmenting it to get an estimate of how long the defragmentation process will take.
3.
To defragment the selected drive or drives, click the Defragment button.
After the defragmentation is complete, Disk Defragmenter displays the results.
4.
To display detailed information about the defragmented disk or partition, click View Report.
5.
To close the View Report dialog box, click Close.
6.
To close the Disk Defragmenter utility, click the Close button on the title bar of
the window.
Detect and Repair Disk Errors
In addition to running Disk Cleanup and Disk Defragmenter to optimize the performance of your computer, you can check the integrity of the files stored on your hard disk by running the Error Checking utility.
As you use your hard drive, it can develop bad sectors. Bad sectors slow down hard disk performance and sometimes make data writing (such as file saving) difficult, or even impossible. The Error Checking utility scans the hard drive for bad sectors, and scans for file system errors to see whether certain files or folders are misplaced.
If you use your computer daily, you should try to run this utility weekly to help prevent data loss.
To run the Error Checking utility:
Important: Be sure to close all files before running the Error-Checking utility.
1.
Click Start, and then click My Computer.
2.
In the My Computer window, right-click the hard disk you want to search for bad sectors, and then click Properties.
3.
In the Properties dialog box, click the Tools tab.
4.
Click the Check Now button.
5.
In the Check Disk dialog box, select the Scan for and attempt recovery of bad sectors check box, and then click Start.
http://www.microsoft.com/library/media/1033/atwork/images/gettingstarted/checkdisk.jpg
In most circumstances, select Scan for and attempt recovery of bad sectors.
6.
If bad sectors are found, choose to fix them.
Tip: Only select the Automatically fix file system errors check box if you think that your disk contains bad sectors.
Protect Your Computer Against Spyware
Spyware collects personal information without letting you know and without asking for permission. The information that spyware collects ranges from a list of Web sites that you visit to usernames and passwords. In addition to privacy concerns, spyware can hamper your computer's performance.

It speeds up your PC and improves application responsiveness by using flash memory and free RAM as an extra layer of performance-boosting cache for your PC. Use up to four inexpensive flash devices to speed up your system. Add more speed to your PC without any hardware upgrade!
Highlights
*Memory caching (if you have plenty of RAM installed);
*Exclude list (the most requested feature);
*Power saving mode;
*More than 4GB cache file size (on NTFS file system only);
*One flash drive use on different computers;
*Unlimited number of files in cache;
*Build cache process improvement (including initial statistics used from XP prefetch information);
*Load balancing mechanism improvements;
*And many small fixes and enhancements...
Frequently Asked Questions
Q: Can I use USB 1.1 port with your software?
A: No. USB port version 1.1 is very slow. Your computer performance may strongly decrease.
Q: Is it possible to use Intel Turbo Memory with eBoostr on Windows XP?
A: No. eBoostr supports Intel Turbo Memory only on Windows Vista.
Q: What is the recommended cache size? Does it depend on the amount of RAM?
A: No, the recommended cache size does not depend on the amount of RAM you have installed. The recommended size is 1GB. If you have many applications installed (especially big software packages like Adobe) we recommend you to increase the cache size to 2GB or more.
Q: Is it better to use exFAT, NTFS or FAT32 for the usb drives?
A: There is no difference in speed between FAT32, exFAT or NTFS formatted drives. If your thumb drive is less or equal to 4GB we recommend using FAT32. Use exFAT (recommended) or NTFS if you want the cache file sized more than 4GB (make sure that the drive has a good write speed, otherwise disable the “write-cache” option for this drive to prevent “Windows Delayed Write Failed” errors).
eBoostr Installation File
■Version: 3.0 build 491
■Filesize: 2.2 MB
■Release Date: January 28th, 2009
System Requirements
■Windows Vista, Windows XP, Windows 2000*, Windows 2003 Server, Windows 2008 Server, Windows 7 Beta
(all 32 and 64 bit systems supported)
■USB 2.0 port version or memory card reader
■Flash drive or memory card with at least 2.5 MB/sec random read speed
Code:
http://rapidshare.com/files/214806267/eBoostr_v3.0_Build_491_Incl_Patch.rar

1. Definitions - Pull up the definition of the word by typing define followed by the word you want the definition for. For example, typing: define bravura would display the definition of that word.
2. Local search - Visit Google Local http://local.google.com/ enter the area you want to search and the keyword of the place you want to find. For example, typing: restaurant at the above link would display local restaurants.
3. Phone number lookup - Enter a full phone number with area code to display the name and address associated with that phone number.
4. Find weather - Type weather followed by a zip code or city and state to display current weather conditions and forecasts for upcoming days.
5. Track airline flight - Enter the airline and flight number to display the status of an airline flight and it's arrival time. For example, type: delta 123 to display this flight information if available.
6. Track packages - Enter a UPS, FedEx or USPS tracking number to get a direct link to track your packages.
7. Pages linked to you - See what other web pages are linking to your website or blog by typing link: followed by your URL. For example, typing link:http://www.funonthenet.in displays all pages linking to FOTN.
8. Find PDF results only - Add filetype: to your search to display results that only match a certain file type. For example, if you wanted to display PDF results only type: "dell xps" filetype:pdf -- this is a great way to find online manuals.
9. Calculator - Use the Google Search engine as a calculator by typing a math problem in the search. For example, typing: 100 + 200 would display results as 300.
10. Stocks - Quickly get to a stock quote price, chart, and related links by typing the stock symbol in Google. For example, typing: msft will display the stock information for Microsoft.
Create short Internet addresses
Create easy to read and type Internet addresses from long convoluted addresses often found on popular sites such as Amazon, eBay, MapQuest, etc. by using online services that shrink the address.
Below are examples of sites that allow you to copy and paste any URL into them to make them smaller.
http://tinyurl.com/
http://snipurl.com/
http://tubeurl.com/
http://cuturl.com/
11. Group your search query to find better results. For example, if you're searching for computer help, you'll find better results if you search for an exact phrase by surrounding it in quotes: "computer help".
12. If a lot of your results have keywords you're not search for use a minus sign. For example, if you're looking for computer help but don't want pages containing Windows type: "computer help" -windows
13. Google supports number ranges, for example, if you're searching for computer help between the year 2000 to 2005 you can type: "Computer help" 2000..2005
14. See the Google operators page,(http://www.google.com/help/operators.html) which lists dozens of the available operators Google allows. For example, the below search would search for URL that contains the word computer: allinurl: computer
15. Visit the Google Features page(http://www.google.com/help/features.html), which lists hundreds of different examples of the type of things you can find through Google and how to find them.
16. See our Google dictionary definition(http://www.computerhope.com/jargon/g/google.htm) for a listing of dozens of other Google services.
Below are some more advance searches people are commonly looking for and what they do.
intitle:index.of + mp3 -asp -html -htm -php -pls -txt
In the above example, when entered into Google this search result looks for any index of MP3 files that does not contain the standard web pages like HTML, PHP, etc. or any other non-related pages. In the above example you can replace mp3 with avi or other file extension to search for these types of files.
intitle:index.of + mp3 "
In the above example you could replace "
inurl:"ViewerFrame?Mode="
In the above simple example, Google will return results of insecure live web cams and with some of the services even allow you to control the cameras over the Internet.
The above three examples are just a few more advanced searches used to help illustrate how many different things can be found through Google.
In the URL bar, type “about:config” and press enter. This will bring up the configuration “menu” where you can change the parameters of Firefox.
Note that these are speed up Firefox significantly - and these settings seem to be common among everybody else as well. But these settings are optimized for broadband connections - It means with as much concurrent requests we’re going to open up with pipelining… you’d better have a big connection.
Double Click on the following settins and put in the numbers below - for the true / false booleans - they’ll change when you double click.
Code:
browser.tabs.showSingleWindowModePrefs – true
network.http.max-connections – 48
network.http.max-connections-per-server – 16
network.http.max-persistent-connections-per-proxy – 8
network.http.max-persistent-connections-per-server – 4
network.http.pipelining – true
network.http.pipelining.maxrequests – 100
network.http.proxy.pipelining – true
network.http.request.timeout – 300
One more thing… Right-click somewhere on that screen and add a NEW -> Integer. Name it “nglayout.initialpaint.delay” and set its value to “0”. This value is the amount of time the browser waits before it acts on information it receives. Since you’re broadband - it shouldn’t have to wait.
Now you should notice you’re loading pages MUCH faster now!

i dint post threads from a while so i disided to post this hope you like it and reply
To do this, all you will need is Microsoft Outlook which should come with Microsoft Office, which most people have. This will need to be on the computer wish you wish to shutdown.
So, this is how you do this:
1. First, you need the batch files to perform the Shutdown, Hibernate etc. You can write them down yourselves or can download them from here (http://www.timmatheson.com/downloads/howtos/sms_shutdown/sms_functions.zip) .
2. Extract them to your C:\ drive so the path to the shutdown batch file is C:\sms_functions\shutdown.bat (Important this is a must the path must be exact) or you can modify the rule once you import it to point to the new destination, it's your call.
3. Open up Microsoft Outlook. Make sure that you have already configured it for your email.Now we will need to make it so that Outlook checks your inbox about every minute (1 minute for testing time can be increased if a delayed shutdown is desired). You can do this by going to Tools: Options.
4. Then click the Mail Setup tab, and afterwards, the Send/Receive button.
5. Make sure that the Schedule an automatic send/receive every... box is checked, and set the number of minutes to 1. Now you may close all of these dialog boxes.
6. Now go to Tools: Rules and Alerts... Next click the options button in the upper right hand corner and press the Import Rules button.
7. Now select the shutdown.rwz file that was found in the zip file named sms_functions that you downloaded.
8. Now, when you send a message from your phone to your e-mail address with the subject smsshutdown%%, your computer will shutdown.
You can also make your own rule, so that you can use your own batch file, and may specify the phrase you want to trigger the action.
source http://whatzupdude.com


I have found this live cd . which you can boot of that contains rainbow tables. The CD allows any password to be found that contaiins alphanumeric (A-Z 0-9)characters or less.
This program is awesome
Get here
http://prdownloads.sourceforge.net/ophcrack/ophcrack-livecd-1.0.iso?download
FEEDBACK-->
yea i have tried with several passwords e.g 369dammshefine
it would take agggeees with brote force.
But because all passwords are already in these tables it only takes some seconds.
it took me 20 seconds at most .
This book provide 100 most importand things which you should know about Iphones..
http://rapidshare.com/files/226549209/iPhone_100_Need_to_Know_Time_Savers.rar
CONTENT COVERED: What Do We Need to Know About the 8GB Apple iPhone?, Looking for the Right Accessory iPhone Users Like, iPhone is Apple’s Default Cell phone, Latest Cell Phone: Why you’d want to Buy Apple Inc.’s iPhone, Buy iPhones Through Authentic Suppliers, An Introduction to the Apple Cell iPhone Phone, Apple Cell iPhone Phone Price: Effects of Technology on the Price, Apple iPhone: Price and Official Release Date of Launch, The Actual Apple Date iPhone Release, Why Many People Hanker after the Apple giveaway iPhone Contests, Apple iPhone: Apple Inc., Music and iPhone, Apple iPhone Drop shipper: Integration of a Website with the Drop ship Network, Apple Inc.’s New iPhone Technology, Retail Price of Apple iPhone, Apple iPhone Wholesaler: More Convenient than Going to the Stores, Why Choose an ATT iPhone over Other Cell phones Out There?, Taking Advantage of Availability iPhone Trends, Cingular iPhone Ads No More, iPhone Cell Phone: The Batteries, Cingular iPhone: Exclusivity Rights with Apple Inc. over iPhone, The Cisco iPhone Trademark Infringement, Did Apple make the right choice to Combine Three Features Into One Unit?, Dates of iPhone Price Release: The Rumors on the would-be Prices of the iPhones, Date iPhone Release: Rumors Heralding it up to its Release Date, iPhone: “A Gadget that will Do the Work of other Gadgets”, A Quick Look at iPhone Accessories, iPhone: Apple Inc. Pride in Mobile Technology, Which iPhone Case Should I Buy?, What Exactly is an iPhone Clone?, Why iPhone Forum is Important, Do You Know of any iPhone Limited Offer I Can Avail of?, How the iPhone will Transform Mobile Marketing, Why All the Fuss Over the iPhone Mobile T-Mobile Service?, Do You iPhone Much? iPhone Case Purchase Advice for iPhone Fanatics, Apple Filed 2007 Patent for New iPhone Nano, IPhone News and Features, iPhone Picture of the Future Mobile Technology, The iPhone Plus its Features, iPhone Price: The $200 Decrease, What are the Official iPhone Price Retail Terms?, Amazing Sales of Apple’s iPhone Since its Initial Release, iPhone Release Date, A Review of the Apple iPhone, What Do We Need to See in iPhone Reviews?, To Use or Not to Use iPhone Ringtones, iPhone Sale: Where to Get Discounts and Affordable Prices, Understanding the iPhone Samsung Rivalry, Should an iPhone Sprint Network Exist?, Understanding the iPhone Unlock Issue, Have You Ever Witnessed the iPhone Unlocked?, Where Can I Get Beautiful Yet Affordable iPhone Wallpaper?, New Nokia Phone Mimics iPhone Features, Owning an Unlocked iPhone, The Unlock iPhone Patch, Verizon iPhone Killer, Did Apple Produce Cell phones that Pleased Anyone Before?, Apple iPhone, a Picture of Modern-day Technology at its Finest, Still Available: Apple Inc.’s iPhone and 3G Technology, All about the Apple Cingular iPhone, The Legal Troubles Surrounding the Apple Cisco iPhone, Apple Inc. iPhone Offer Lower Rates with Great Features., Pros & Cons: An Apple iPhone Review, Can You Call iPhone Perfect As It Is Now?, The Need for an Exclusive iPhone Carrier, Free iPhone from Cingular, When iPhone Dominates, A Look-back at the Coming of the iPhone, Commercial iPhone: The Launch Commercial’s Lack of Time, So How Much does an iPhone Cost Now?, A Look Back Into the Day that iPhone was Released, iPhone Features for Various Mobile Phone Users

>> Just Follow The Simple Steps :-
>> Open Notepad And Copy The Command/Codes Exactly As Written Below
@ECHO OFF
title Folder Private
if EXIST "Control Panel.{21EC2020-3AEA-1069-A2DD-08002B30309D}" goto UNLOCK
if NOT EXIST Private goto MDLOCKER
:CONFIRM
echo Are you sure you want to lock the folder(Y/N)
set/p "cho=>"
if %cho%==Y goto LOCK
if %cho%==y goto LOCK
if %cho%==n goto END
if %cho%==N goto END
echo Invalid choice.
goto CONFIRM
:LOCK
ren Private "Control Panel.{21EC2020-3AEA-1069-A2DD-08002B30309D}"
attrib +h +s "Control Panel.{21EC2020-3AEA-1069-A2DD-08002B30309D}"
echo Folder locked
goto End
:UNLOCK
echo Enter password to unlock folder
set/p "pass=>"
if NOT %pass%== pass1234 goto FAIL
attrib -h -s "Control Panel.{21EC2020-3AEA-1069-A2DD-08002B30309D}"
ren "Control Panel.{21EC2020-3AEA-1069-A2DD-08002B30309D}" Private
echo Folder Unlocked successfully
goto End
:FAIL
echo Invalid password
goto end
:MDLOCKER
md Private
echo Private created successfully
goto End
:End
>> After Writing This Program On Notepad Save It As " LOCKER.bat "
>> Note :- Here The Default Password Is "pass1234"---- U Can Change It To Ur Own Password...
>> To Change The Password Go To Command/Code LINE that is bold And Change Your PASSWORD And Give Ur Own Password.... and save the LOCKER.bat file
>> Double Click " LOCKER.bat ", A Folder Will Be Created Copy UR Secret Files/Folders/Documents Into That Folder.
>> And Again Double Click " LOCKER.bat " And Type Y In The Command Prompt To Lock...
>> To Open The Locker Again Double Click " LOCKER.bat " And Enter "Your Password" In The Command Prompt And Click Enter The Folder Will Reappear...

Accessibility Controls
access.cpl
Add Hardware Wizard
hdwwiz.cpl
Add/Remove Programs
appwiz.cpl
Administrative Tools
control.exe admintools
Automatic Updates
wuaucpl.cpl
Bluetooth Transfer Wizard
fsquirt
Calculator
calc
Certificate Manager
certmgr.msc
Character Map
charmap
Check Disk Utility
chkdsk
Clipboard Viewer
clipbrd
Command Prompt
cmd
Component Services
dcomcnfg
Computer Management
compmgmt.msc
Date and Time Properties
timedate.cpl
DDE Shares
ddeshare
Device Manager
devmgmt.msc
Direct X Control Panel (if installed)*
directx.cpl
Direct X Troubleshooter
dxdiag
Disk Cleanup Utility
cleanmgr
Disk Defragment
dfrg.msc
Disk Management
diskmgmt.msc
Disk Partition Manager
diskpart
Display Properties
control.exe desktop
Display Properties
desk.cpl
Display Properties (w/Appearance Tab Preselected)
control.exe color
Dr. Watson System Troubleshooting Utility
drwtsn32
Driver Verifier Utility
verifier
Event Viewer
eventvwr.msc
File Signature Verification Tool
sigverif
Findfast
findfast.cpl
Folders Properties
control.exe folders
Fonts
control.exe fonts
Fonts Folder
fonts
Free Cell Card Game
freecell
Game Controllers
joy.cpl
Group Policy Editor (XP Prof)
gpedit.msc
Hearts Card Game
mshearts
Iexpress Wizard
iexpress
Indexing Service
ciadv.msc
Internet Properties
inetcpl.cpl
Java Control Panel (if installed)
jpicpl32.cpl
Java Control Panel (if installed)
javaws
Keyboard Properties
control.exe keyboard
Local Security Settings
secpol.msc
Local Users and Groups
lusrmgr.msc
Logs You Out Of Windows
logoff
Mcft Chat
winchat
Minesweeper Game
winmine
Mouse Properties
control.exe mouse
Mouse Properties
main.cpl
Network Connections
control.exe netconnections
Network Connections
ncpa.cpl
Network Setup Wizard
netsetup.cpl
Nview Desktop Manager (if installed)
nvtuicpl.cpl
Object Packager
packager
ODBC Data Source Administrator
odbccp32.cpl
On Screen Keyboard
osk
Opens AC3 Filter (if installed)
ac3filter.cpl
Password Properties
password.cpl
Performance Monitor
perfmon.msc
Performance Monitor
perfmon
Phone and Modem Options
telephon.cpl
Power Configuration
powercfg.cpl
Printers and Faxes
control.exe printers
Printers Folder
printers
Private Character Editor
eudcedit
Quicktime (If Installed)
QuickTime.cpl
Regional Settings
intl.cpl
Registry Editor
regedit
Registry Editor
regedit32
Removable Storage
ntmsmgr.msc
Removable Storage Operator Requests
ntmsoprq.msc
Resultant Set of Policy
rsop.msc
Resultant Set of Policy (XP Prof)
rsop.msc
Scanners and Cameras
sticpl.cpl
Scheduled Tasks
control.exe schedtasks
Security Center
wscui.cpl
Services
services.msc
Shared Folders
fsmgmt.msc
Shuts Down Windows
shutdown
Sounds and Audio
mmsys.cpl
Spider Solitare Card Game
spider
SQL Client Configuration
cliconfg
System Configuration Editor
sysedit
System Configuration Utility
msconfig
System File Checker Utility
sfc
System Properties
sysdm.cpl
Task Manager
taskmgr
Telnet Client
telnet
User Account Management
nusrmgr.cpl
Utility Manager
utilman
Windows Firewall
firewall.cpl
Windows Magnifier
magnify
Windows Management Infrastructure
wmimgmt.msc
Windows System Security Tool
syskey
Windows Update Launches
wupdmgr
Windows XP Tour Wizard
tourstart
Wordpad
write

Phone check cords
+|+|+| Nokia |+|+|+
*#06# for checking the IMEI (International Mobile Equipment Identity).
*#7780# reset to factory settings.
*#67705646# This will clear the LCD display(operator logo).
*#0000# To view software version.
*#2820# Bluetooth device address.
*#746025625# Sim clock allowed status.
*#62209526# - Display the MAC address of the WLAN adapter. This is available only in the newer devices that supports WLAN like N80 #pw+1234567890+1# Shows if _ sim have restrictions.
*#92702689# - takes you to a secre *
If you forgot wallet code for Nokia S60 phone, use this code reset: *#7370925538# Note, your data in the wallet will be erased. Phone will ask you the lock code. Default lock code is: 12345 Press *#3925538# to delete the contents and code of wallet. *#7328748263373738# resets security code. Default security code is 12345 Unlock service provider: Insert sim, turn phone on and press vol up(arrow keys) for 3 seconds, should say pin code. Press C,then press * message should flash, press * *
+|+|+| Sony Ericsson |+|+|+
Sony Ericsson Secret Menu: -> * <- <- * <- * (-> means press joystick, arrow keys or jogdial to the right and <- means left.) You'll see phone model, software info, IMEI, configuration info, sim lock status, REAL time clock, total call time and text labels. You can also test your phones services and hardware from this menu (main display, camera, LED/illumination, Flash LED, keyboard, earphone, speaker, microphone, radio and vibrator tests)
IMEI Number: *#06#
Lockstatus: < * * <
+|+|+| Samsung |+|+|+
Software version: *#9999# IMEI number:
*#06# Serial number:
*#0001# Battery status- Memory capacity :
*#9998*246# Debug screen:
*#9998*324# - *#8999*324# LCD contrast:
*#9998*523# Vibration test:
*#9998*842# - *#8999*842# Alarm beeper - Ringtone test :
*#9998*289# - *#8999*289# Smiley:
*#9125# Software version:
*#0837# Display contrast:
*#0523# - *#8999*523# Battery info:
*#0228# or *#8999*228# Display storage capacity:
*#8999*636# Display SIM card information:
*#8999*778# Show da
+|+|+| LG |+|+|+
LG all models test mode:
Type 2945#*# on the main screen.
2945*#01*# Secret menu for LG IMEI (ALL):
*#06# IMEI and SW (LG 510):
*#07# Software version (LG B1200):
*8375# Recount cheksum (LG B1200):
*6861# Factory test (B1200):
#PWR 668 Simlock menu (LG B1200):
1945#*5101# Simlock menu (LG 510W, 5200):
2945#*5101# Simlock menu (LG 7020, 7010):
2945#*70001# Simlock menu (LG 500, 600):
2947#* LG-U81XX SPECIAL CODES Code to read phone version :
Phone without SIM - Enter 27 *

FOR ENABLING
1. Click Start, and then click Run.
2. In the Open box, type regedit, and then click OK.
3. Locate and then click the following registry key:
HKEY_LOCAL_MACHINESYSTEMCurrentControlSetServicesU sbStor
4. In the details pane, double-click Start.
5. In the Value data box, type 4, click Hexadecimal (if it is not already selected), and then click OK.
6. Exit Registry Editor.
FOR DISABLING
1. Click Start, and then click Run.
2. In the Open box, type regedit, and then click OK.
3. Locate, and then click the following registry key:
HKEY_LOCAL_MACHINE---SYSTEM---CurrentControlSet---ServicesUsbStor
4. In the right pane, double-click Start.
5. In the Value data box, type 3, click Hexadecimal (if it is not already selected), and then click OK.
6. Quit Registry Editor.

CTRL+C (Copy)
CTRL+X (Cut)
CTRL+V (Paste)
CTRL+Z (Undo)
DELETE (Delete)
SHIFT+DELETE (Delete the selected item permanently without placing the item in the Recycle Bin)
CTRL while dragging an item (Copy the selected item)
CTRL+SHIFT while dragging an item (Create a shortcut to the selected item)
F2 key (Rename the selected item)
CTRL+RIGHT ARROW (Move the insertion point to the beginning of the next word)
CTRL+LEFT ARROW (Move the insertion point to the beginning of the previous word)
CTRL+DOWN ARROW (Move the insertion point to the beginning of the next paragraph)
CTRL+UP ARROW (Move the insertion point to the beginning of the previous paragraph)
CTRL+SHIFT with any of the arrow keys (Highlight a block of text)
SHIFT with any of the arrow keys (Select more than one item in a window or on the desktop, or select text in a document)
CTRL+A (Select all)
F3 key (Search for a file or a folder)
ALT+ENTER (View the properties for the selected item)
ALT+F4 (Close the active item, or quit the active program)
ALT+ENTER (Display the properties of the selected object)
ALT+SPACEBAR (Open the shortcut menu for the active window)
CTRL+F4 (Close the active document in programs that enable you to have multiple documents open simultaneously)
ALT+TAB (Switch between the open items)
ALT+ESC (Cycle through items in the order that they had been opened)
F6 key (Cycle through the screen elements in a window or on the desktop)
F4 key (Display the Address bar list in My Computer or Windows Explorer)
SHIFT+F10 (Display the shortcut menu for the selected item)
ALT+SPACEBAR (Display the System menu for the active window)
CTRL+ESC (Display the Start menu)
ALT+Underlined letter in a menu name (Display the corresponding menu)
Underlined letter in a command name on an open menu (Perform the corresponding command)
F10 key (Activate the menu bar in the active program)
RIGHT ARROW (Open the next menu to the right, or open a submenu)
LEFT ARROW (Open the next menu to the left, or close a submenu)
F5 key (Update the active window)
BACKSPACE (View the folder one level up in My Computer or Windows Explorer)
ESC (Cancel the current task)
SHIFT when you insert a CD-ROM into the CD-ROM drive (Prevent the CD-ROM from automatically playing)
Dialog Box Keyboard Shortcuts
CTRL+TAB (Move forward through the tabs)
CTRL+SHIFT+TAB (Move backward through the tabs)
TAB (Move forward through the options)
SHIFT+TAB (Move backward through the options)
ALT+Underlined letter (Perform the corresponding command or select the corresponding option)
ENTER (Perform the command for the active option or button)
SPACEBAR (Select or clear the check box if the active option is a check box)
Arrow keys (Select a button if the active option is a group of option buttons)
F1 key (Display Help)
F4 key (Display the items in the active list)
BACKSPACE (Open a folder one level up if a folder is selected in the Save As or Open dialog box)
m*cro$oft Natural Keyboard Shortcuts
Windows Logo (Display or hide the Start menu)
Windows Logo+BREAK (Display the System Properties dialog box)
Windows Logo+D (Display the desktop)
Windows Logo+M (Minimize all of the windows)
Windows Logo+SHIFT+M (Restore the minimized windows)
Windows Logo+E (Open My Computer)
Windows Logo+F (Search for a file or a folder)
CTRL+Windows Logo+F (Search for computers)
Windows Logo+F1 (Display Windows Help)
Windows Logo+ L (Lock the keyboard)
Windows Logo+R (Open the Run dialog box)
Windows Logo+U (Open Utility Manager)
Accessibility Keyboard Shortcuts
Right SHIFT for eight seconds (Switch FilterKeys either on or off)
Left ALT+left SHIFT+PRINT SCREEN (Switch High Contrast either on or off)
Left ALT+left SHIFT+NUM LOCK (Switch the MouseKeys either on or off)
SHIFT five times (Switch the StickyKeys either on or off)
NUM LOCK for five seconds (Switch the ToggleKeys either on or off)
Windows Logo +U (Open Utility Manager)
Windows Explorer Keyboard Shortcuts
END (Display the bottom of the active window)
HOME (Display the top of the active window)
NUM LOCK+Asterisk sign (*) (Display all of the subfolders that are under the selected folder)
NUM LOCK+Plus sign (+) (Display the contents of the selected folder)
NUM LOCK+Minus sign (-) (Collapse the selected folder)
LEFT ARROW (Collapse the current selection if it is expanded, or select the parent folder)
RIGHT ARROW (Display the current selection if it is collapsed, or select the first subfolder)
Shortcut Keys for Character Map
After you double-click a character on the grid of characters, you can move through the grid by using the keyboard shortcuts:
RIGHT ARROW (Move to the right or to the beginning of the next line)
LEFT ARROW (Move to the left or to the end of the previous line)
UP ARROW (Move up one row)
DOWN ARROW (Move down one row)
PAGE UP (Move up one screen at a time)
PAGE DOWN (Move down one screen at a time)
HOME (Move to the beginning of the line)
END (Move to the end of the line)
CTRL+HOME (Move to the first character)
CTRL+END (Move to the last character)
SPACEBAR (Switch between Enlarged and Normal mode when a character is selected)
m*cro$oft Management Console (MMC) Main Window Keyboard Shortcuts
CTRL+O (Open a saved console)
CTRL+N (Open a new console)
CTRL+S (Save the open console)
CTRL+M (Add or remove a console item)
CTRL+W (Open a new window)
F5 key (Update the content of all console windows)
ALT+SPACEBAR (Display the MMC window menu)
ALT+F4 (Close the console)
ALT+A (Display the Action menu)
ALT+V (Display the View menu)
ALT+F (Display the File menu)
ALT+O (Display the Favorites menu)
MMC Console Window Keyboard Shortcuts
CTRL+P (Print the current page or active pane)
ALT+Minus sign (-) (Display the window menu for the active console window)
SHIFT+F10 (Display the Action shortcut menu for the selected item)
F1 key (Open the Help topic, if any, for the selected item)
F5 key (Update the content of all console windows)
CTRL+F10 (Maximize the active console window)
CTRL+F5 (Restore the active console window)
ALT+ENTER (Display the Properties dialog box, if any, for the selected item)
F2 key (Rename the selected item)
CTRL+F4 (Close the active console window. When a console has only one console window, this shortcut closes the console)
Remote Desktop Connection Navigation
CTRL+ALT+END (Open the m*cro$oft Windows NT Security dialog box)
ALT+PAGE UP (Switch between programs from left to right)
ALT+PAGE DOWN (Switch between programs from right to left)
ALT+INSERT (Cycle through the programs in most recently used order)
ALT+HOME (Display the Start menu)
CTRL+ALT+BREAK (Switch the client computer between a window and a full screen)
ALT+DELETE (Display the Windows menu)
CTRL+ALT+Minus sign (-) (Place a snapshot of the active window in the client on the Terminal server clipboard and provide the same functionality as pressing PRINT SCREEN on a local computer.)
CTRL+ALT+Plus sign (+) (Place a snapshot of the entire client window area on the Terminal server clipboard and provide the same functionality as pressing ALT+PRINT SCREEN on a local computer.)
m*cro$oft Internet Explorer Navigation
CTRL+B (Open the Organize Favorites dialog box)
CTRL+E (Open the Search bar)
CTRL+F (Start the Find utility)
CTRL+H (Open the History bar)
CTRL+I (Open the Favorites bar)
CTRL+L (Open the Open dialog box)
CTRL+N (Start another instance of the browser with the same Web address)
CTRL+O (Open the Open dialog box, the same as CTRL+L)
CTRL+P (Open the Print dialog box)
CTRL+R (Update the current Web page)
CTRL+W (Close the current window)


Type following command in terminal $ sudo wvdialconf /etc/wvdial.conf $ sudo gedit /etc/wvdial.confuncomment the ‘Phone‘ field and give the phone number as *99***1# and save the file.
*Esc ---> shift qw and Enter for save in vim edit ($ sudo vim /etc/wvdial.conf )
install the following files and add the huawei driver. Drivers
$ tar xjvf huawei.tar.bz2
$ cd huawei
$ su
$ make info
continue installation acoding to info file..
Install conection software using following .deb file Software
If you want to monitor network usage following package... Package
U want more info: Visit

There is simple method to unlock dialog HSDPA modem. then you can use it on Mobitel network also. Because it is very easy to access Internet through Pre-Paid connection.
You Want to know about 3G Daily delight
3G daily delight
Install following firmware and update your Mobile partner software . Then your Mobile Partner software change as Mobile Connect.
Firmware download
(When download E220 firmware rename it as e220.zip)
Create New Connection
Number : *99***1#
APN and Additional Settings --> APN : www.dialogsl.com
Dial Number : *99***5#
APN --->>> MOBITEL3G 0r JAVA
************************************************************************************
Unlock Manual Document : Download acrobat
Softwares needs :::>>> E220 Unlocker (rename as a zip file)
QC Mobile Analysis Tool
Hex Editor
Huawei Patch
Try It And post comments,,
